Every creator who's been posting for a while gets the same message eventually. Sometimes it's a DM, sometimes a comment under a reel: "Do you have a course on this?"
And most people's honest answer is "no, but I've thought about it." Then they open a course platform, see the $150-a-month price tag, watch a 40-minute onboarding video about funnels and upsell sequences, and quietly close the tab.
This guide is for the version of you that closes the tab. You don't need a course platform to sell a course. You need a clear idea, a phone or a laptop with a decent microphone, and a place to take payment that your audience already visits every day: your link in bio.
We'll go through the whole thing, from figuring out what the course should actually be about to the first week after launch. It's long, so grab a coffee. Skip around if you need to.
First, a reality check on what a "course" is
When people hear "online course" they picture something huge. Twelve modules, a hundred lessons, workbooks, a private community, a certificate at the end.
That's one kind of course, and it's the kind that takes six months to make and often never ships.
The courses that sell best for small and mid-sized creators are usually much smaller. They solve one specific problem for one specific person, and they do it in an afternoon or a weekend of watching. Think:
- "Edit your first YouTube video in DaVinci Resolve in 90 minutes"
- "The 5-day plan to get your sourdough starter actually working"
- "Notion for freelancers: set up your client system in one evening"
- "Learn to read a nutrition label in 30 minutes, with real grocery examples"
None of those are epic. All of them are things people will happily pay $29 to $149 for, because the result is concrete and the time commitment feels doable.
So before you plan anything, let go of the idea that your course needs to be big to be worth money. Small and finished beats big and imaginary, every single time.
Step 1: Find the course people are already asking you for
The best course topic is almost never the one you're most excited to teach. It's the one people keep asking you about.
Here's a simple way to find it. Spend 20 minutes going through:
- Your DMs — what do people ask how to do?
- Your comments — which posts get "wait, how did you do that?" replies?
- Your saves and shares — which posts do people bookmark? Saves are a quiet signal of "I want to come back and learn this."
- Questions you answer over and over — if you've typed the same explanation five times, that's a lesson.
Write every question down in a list. Don't filter yet. After a while you'll notice the same few themes coming up again and again. That cluster is your course.
If nothing stands out, ask directly. Post a story with a question box: "If I made a short course, what would you want it to teach?" You'll get answers, and more importantly you'll get answers in your audience's own words, which you'll reuse later when you write your sales page.
Narrow it until it's a little uncomfortable
Once you have a theme, narrow it. Then narrow it again.
"Photography" is a topic. "Phone photography" is a niche. "Shooting your own product photos for Etsy on an iPhone" is a course. The narrower version is easier to make, easier to describe, and easier to buy, because the person reading it immediately knows if it's for them.
A useful test: can you finish this sentence without using the word "and"?
This course helps [specific person] go from [where they are now] to [specific result].
"This course helps Etsy sellers go from blurry kitchen-table photos to clean, bright product shots using only their phone." That's a course.
Step 2: Outline the course backwards from the result
Now that you know the result, plan the course by working backwards from it. Ask yourself: what are the 3 to 6 big steps someone has to take to get from where they are to that result?
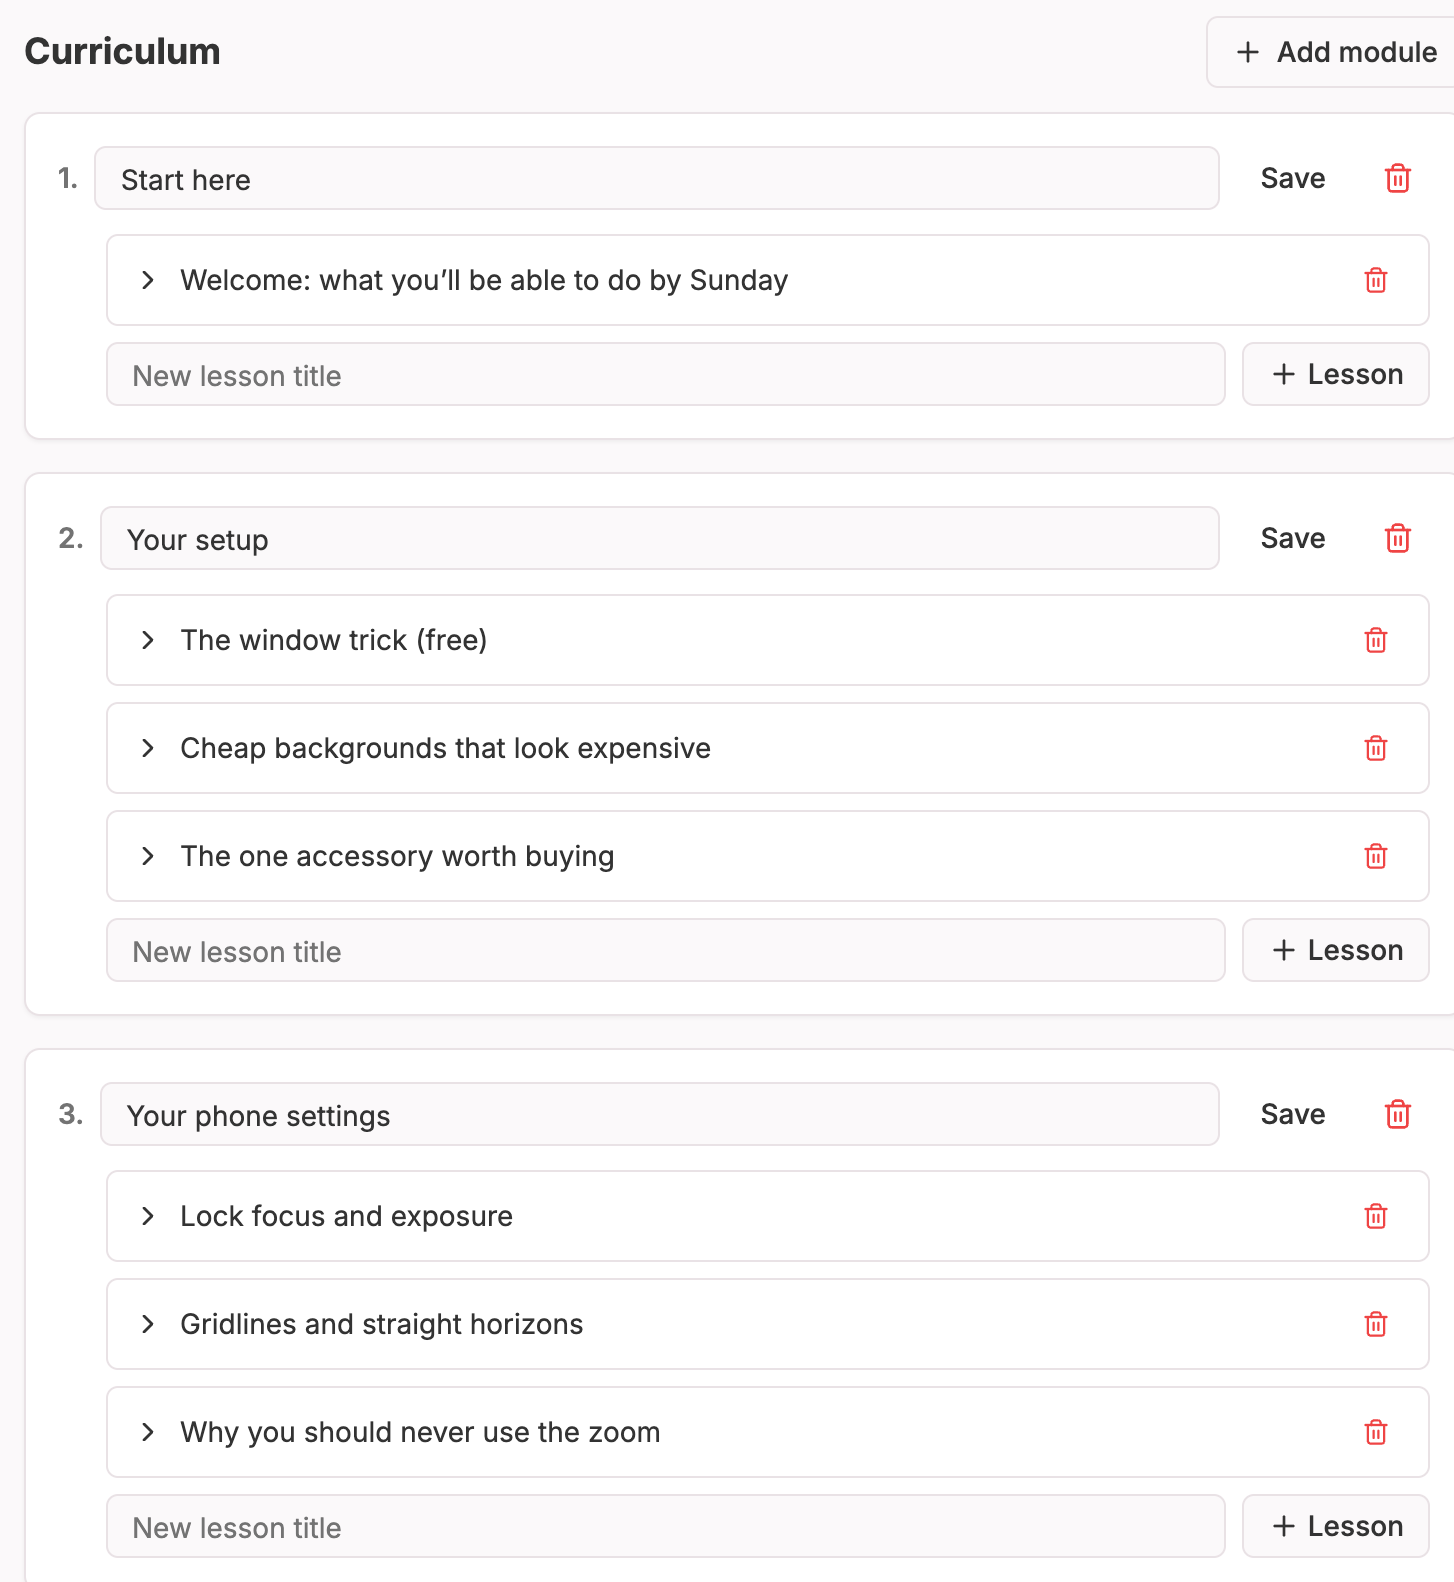
Each of those steps becomes a module. Each module gets a few short lessons.
Here's what that looks like for the Etsy photo course:
- Module 1: Your setup — the window trick, cheap backgrounds, the one accessory worth buying
- Module 2: Your phone settings — locking focus and exposure, gridlines, why you should never use the zoom
- Module 3: Shooting — angles that sell, shooting a whole product line in one session
- Module 4: Editing — a five-minute edit in a free app, keeping colours consistent
- Module 5: Using the photos — sizes for Etsy and Instagram, a simple shot list for every new product
That's it. Five modules, maybe 15 to 20 lessons in total. Totally doable.

A few rules that make your outline better:
- One idea per lesson. If a lesson covers two things, split it. Short lessons feel like progress, and progress is what keeps people watching.
- Aim for 3 to 10 minutes per lesson. Long lessons get abandoned halfway through.
- Put a quick win in the first module. Something the student can do in the first 15 minutes and see a result. That first win is what makes people trust the rest of the course.
- Cut anything that's "nice to know." If it doesn't move the student towards the result, it goes in a bonus or nowhere at all.
Write the outline in a plain document first. Don't open any software until you're happy with it.
Step 3: Record it (with what you already own)
This is the part people overthink the most. Let's keep it simple.
You don't need a studio. You need:
- Decent sound. Bad audio makes people leave far faster than mediocre video. A $20–40 clip-on lavalier mic that plugs into your phone is the single best upgrade you can make. Record in a room with soft stuff in it (sofa, curtains, rugs) to cut echo.
- Decent light. Face a window. That's honestly most of it.
- A stable camera. A phone on a cheap tripod is fine. A laptop webcam is fine for talking-head lessons if the light is good.
- Screen recording, if you're teaching software. Loom, OBS and the built-in recorders on Mac and Windows all work.
Talking head, screen, or both?
Pick the format that suits what you're teaching:
- Screen recordings for software, spreadsheets, design tools, anything on a computer.
- Over-the-shoulder or overhead shots for hands-on skills: cooking, drawing, crafts, instruments.
- Talking head for mindset, strategy and explaining concepts. Keep these short — a face talking for 15 minutes is hard to watch.
Mixing them is great. A quick talking-head intro to each module, then the hands-on lessons, works really well and makes the course feel personal.
Don't script it word for word
Scripts tend to sound like scripts. Instead, write bullet points for each lesson and talk through them as if you were explaining it to a friend on a call. If you mess up, pause, take a breath, and start the sentence again. You can cut the mistake out later, or just leave it in. Students don't expect TV presenters. They expect someone who knows the topic and is clearly a real person.
Batching helps a lot. Record one module per session rather than one lesson a day. You'll get into a rhythm and the lessons will feel consistent.
Where the videos live
Here's the part that saves you a lot of money: you don't need to host the video yourself.
Upload each lesson to YouTube as Unlisted, or to Vimeo or Loom. Unlisted YouTube videos don't show up in search or on your channel; only people with the link can watch them. Then you embed those videos in your course.
Is it possible for someone to share an unlisted link? Yes. Is it worth worrying about at this stage? Honestly, no. The people who'd go hunting for a leaked link to your $49 course were never going to buy it anyway. The people who buy are paying for the structure, the order, the "here's exactly what to do next." That's the product, not just the video files.
On Lynq, each lesson takes a YouTube, Vimeo or Loom link and embeds it in the lesson player, so you never pay for video storage or bandwidth.
Step 4: Add the stuff that makes it feel complete
Videos are the core, but a few small extras make a course feel much more valuable than its runtime:
- Lesson notes. A short written summary under each video: the key steps, the settings you used, any links you mentioned. People love being able to skim instead of rewatching.
- Resources. Checklists, templates, cheat sheets, a shot list, a spreadsheet. Link them right in the lesson they belong to.
- A "start here" lesson. Two minutes: what the course covers, how long it takes, how to get the most out of it. It sets expectations and reduces "I'm lost" emails.
- A final "what next" lesson. Where should students go from here? This is also the natural spot to mention your next product, a membership, or a 1:1 call.
In Lynq, every lesson has space for notes and a list of resource links alongside the video, so you can keep everything for a lesson in one place.
Step 5: Price it (and stop agonising about it)
Pricing is where most people freeze. Some practical guidelines:
- Short, focused courses (1–2 hours): usually somewhere around $29–$79.
- Deeper courses (3–6 hours with resources): often $79–$199.
- Courses tied to a clear money result (getting clients, raising prices, landing a job) can go higher, because the value to the buyer is easy to see.
Then a few honest truths about pricing:
You will probably price it too low. Almost every first-time course creator does. If you're torn between two prices, pick the higher one. You can always run a discount; it's much harder to raise a price that people already know.
Round numbers convert fine. You don't need $47 instead of $50. Pick whatever feels natural to say out loud.
Price on the result, not the runtime. "Is 90 minutes of video worth $79?" is the wrong question. "Is getting good product photos for my shop worth $79?" is the right one.
Launch discounts are your friend. A launch price for the first few days ("$59 until Friday, then $79") gives people a reason to buy now instead of "later" — and later usually means never. Lynq has discount codes built in, so you can create something like LAUNCH20 with an expiry date and a cap on the number of uses.
Step 6: Set it up on your link in bio
Here's where selling from your link in bio really pays off. Your audience doesn't have to go to some new website they've never seen. They tap the link they already know, see the course, and buy it.
On Lynq, the setup looks like this:
- Connect payouts. Lynq uses Stripe Connect, so money goes straight to your own Stripe account. If you've never used Stripe, the onboarding takes about ten minutes. Have your ID and bank details handy.
- Create the course in the Courses section of your dashboard. Give it a title, a description and a cover image.
- Add modules and lessons. Paste in your video links, add your notes and resources, and drag things into the right order.
- Set the price and currency.
- Publish it. Courses stay hidden until you switch them on, so you can build the whole thing in peace and only go live when you're ready.
Once it's published, the course shows up on your page alongside your links and other products. You can drag it to wherever you want it on the page. If you're launching, put it near the top.
What happens when someone buys
This bit matters, because a clunky purchase experience kills sales.
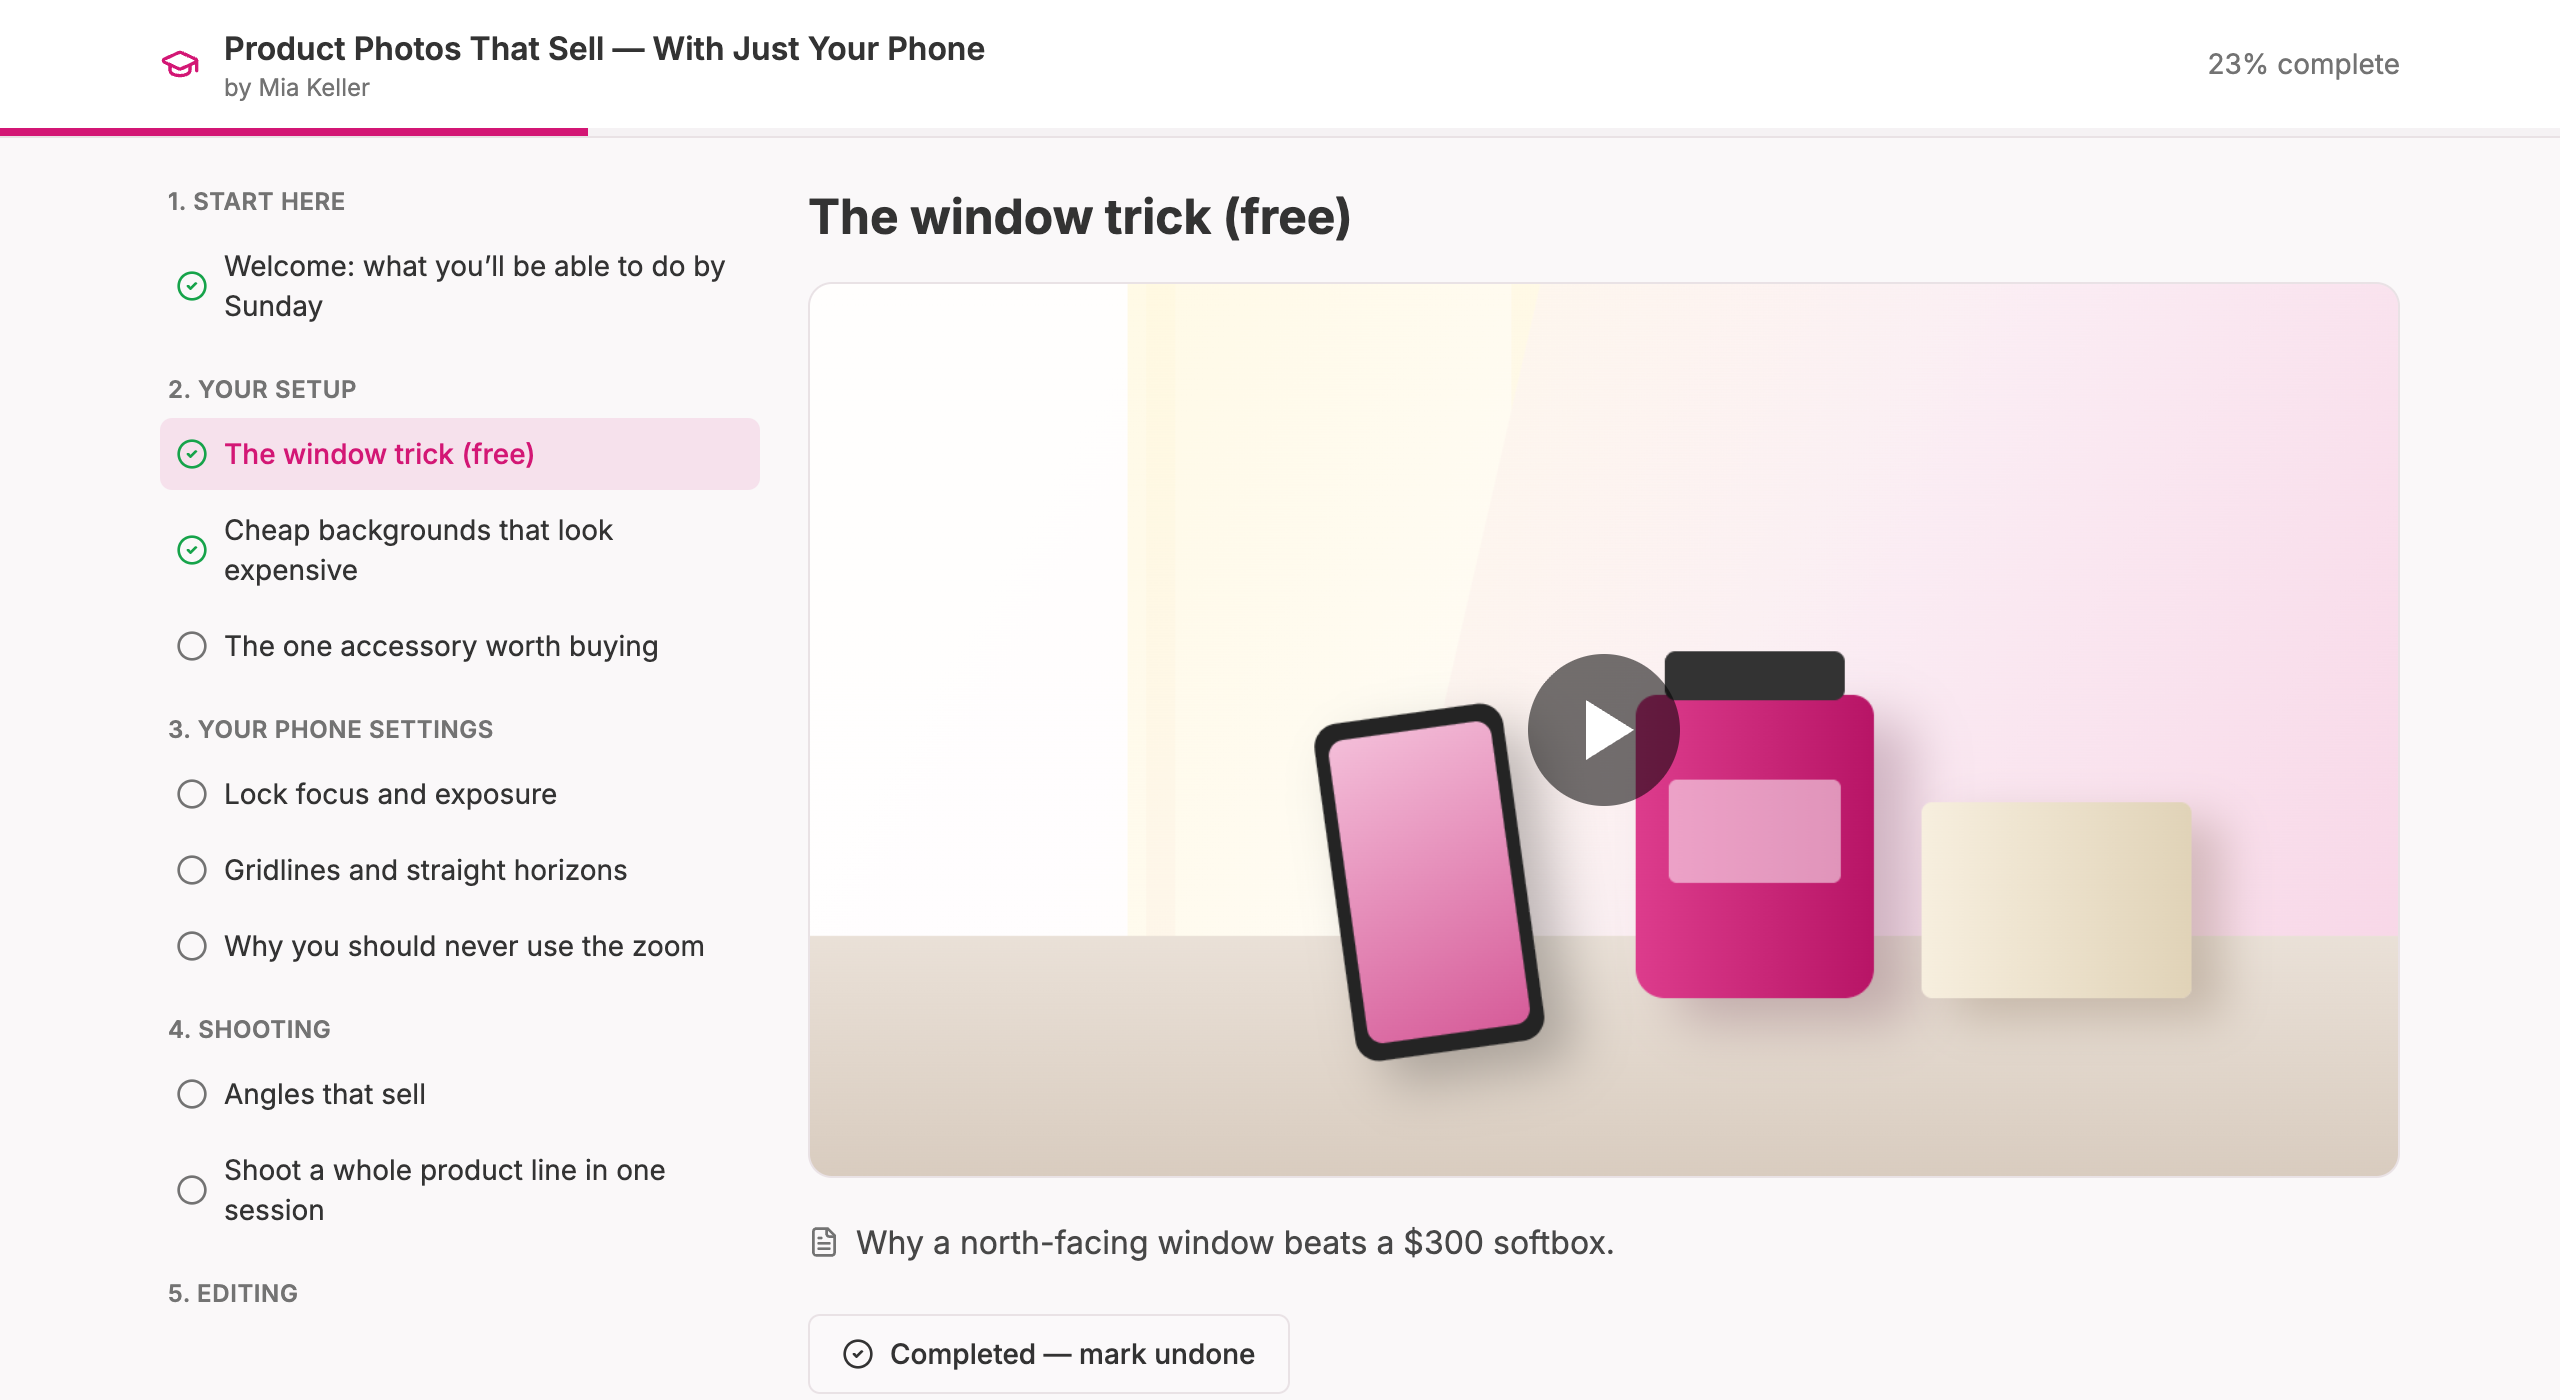
When a buyer taps the course, they check out with a card, Apple Pay or Google Pay — no account creation, no password to remember. Right after paying they get access to the course player, plus an email with a private access link so they can come back anytime from any device. (And when someone inevitably loses that email, they can request a fresh link with the address they bought with, instead of messaging you.) Their progress is saved as they mark lessons complete.
They're also added to your subscriber list, which is quietly one of the most valuable parts of the whole thing. A buyer is worth far more than a follower. They've already trusted you with money once.
Write the description like a human
Your course description is your sales page. It doesn't need to be long. It needs to answer five questions:
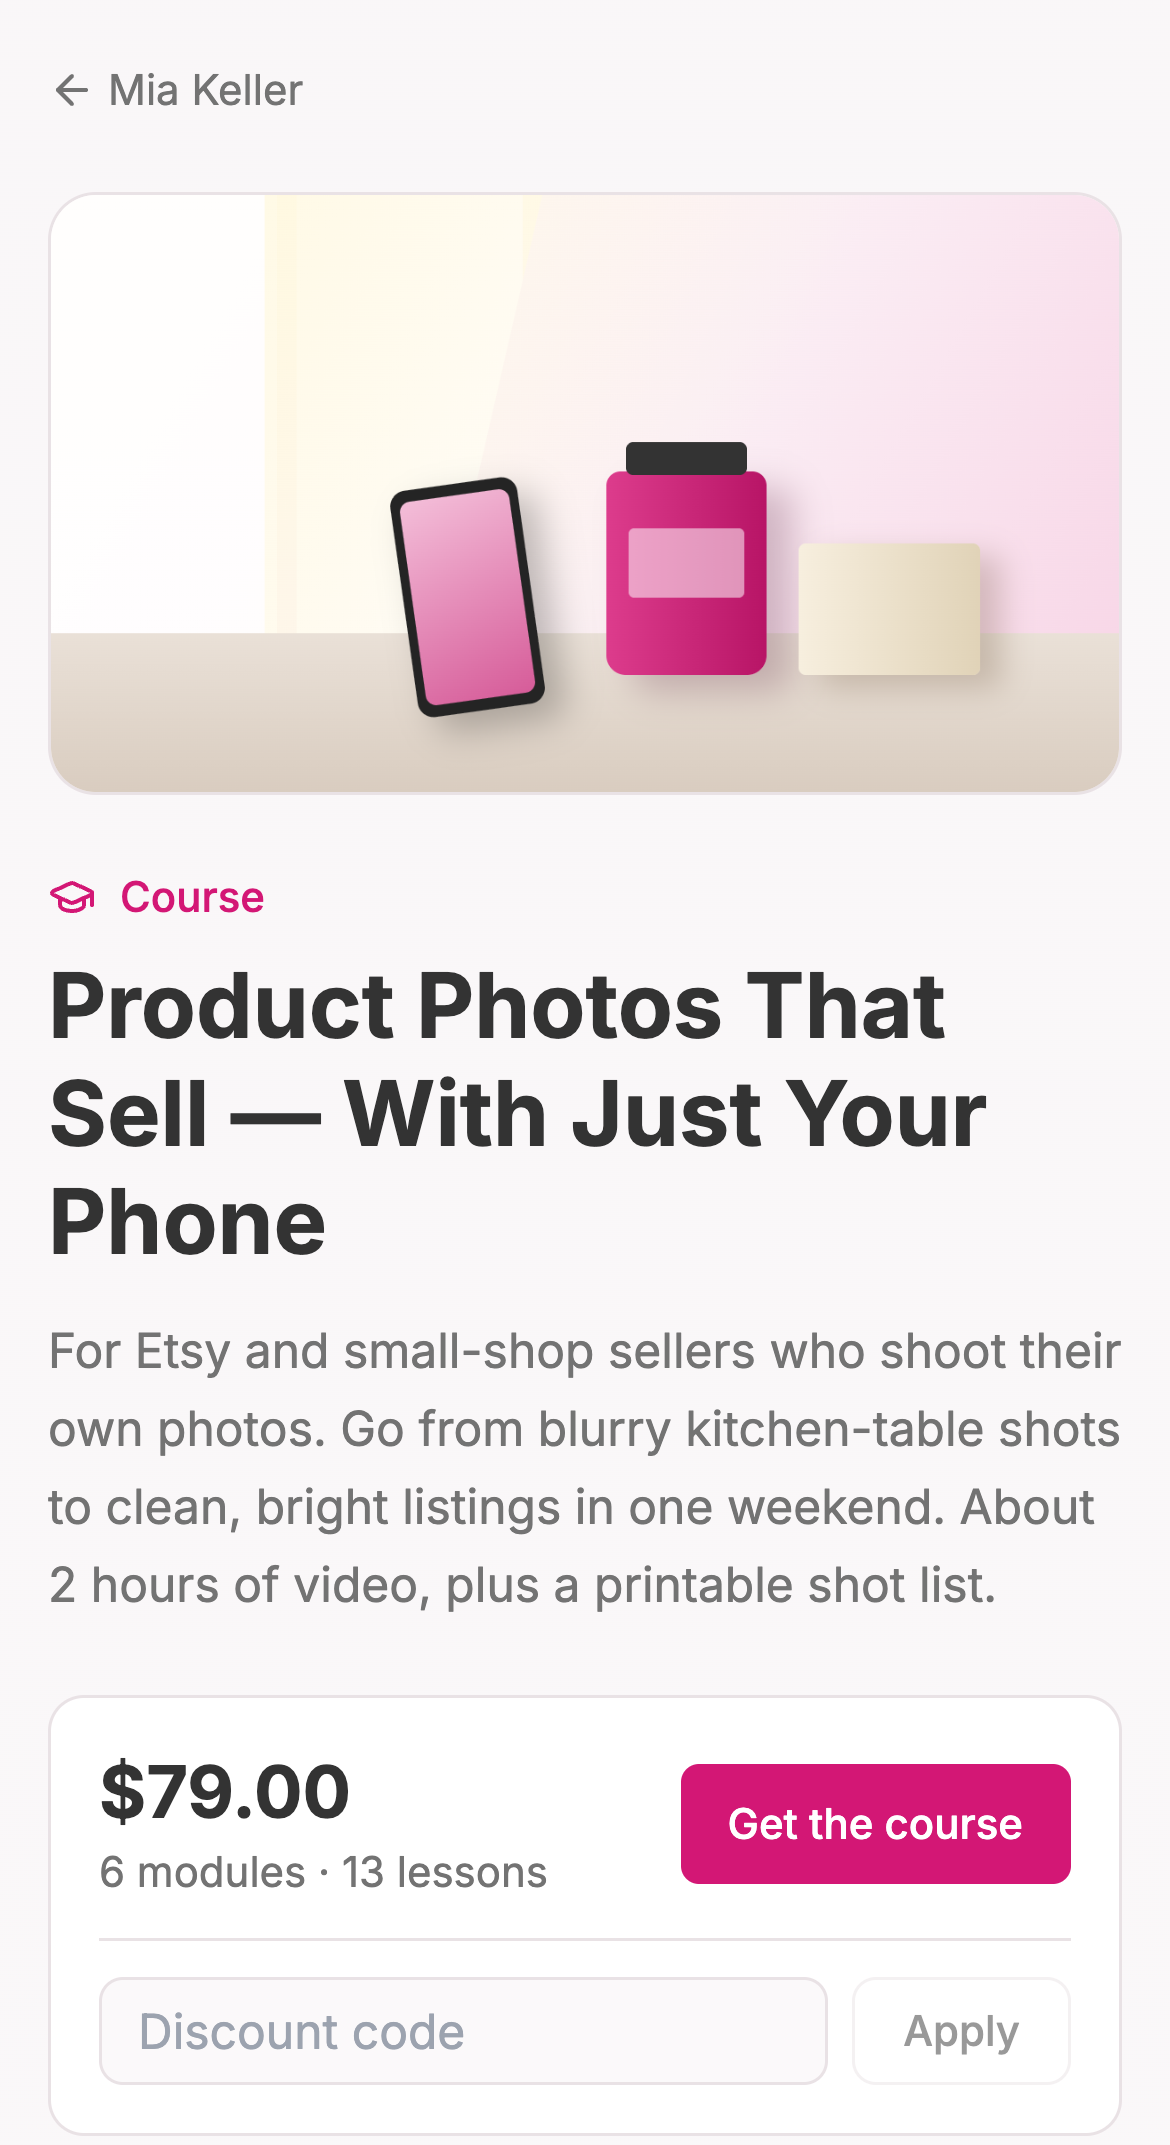
- Who is this for? ("For Etsy sellers who shoot their own product photos")
- What will they be able to do afterwards? (the specific result)
- What's inside? (list the modules — people like seeing the shape of it)
- How long does it take? ("About 2 hours of video, plus a printable shot list")
- Why you? (one or two sentences — your experience, your results, not your life story)
Remember the question-box answers from Step 1? Use those exact phrases. When a reader sees their own words in your description, it feels written for them, because it was.
Step 7: Launch it like a person, not a marketing department
You don't need a webinar funnel. You need to tell your audience, clearly and more than once, that the thing they asked for exists.
A simple one-week launch:
- A few days before: Share behind-the-scenes clips of you recording. Mention that a course is coming and what it's about. Ask people to reply or comment if they want to be told when it's out. This builds a little anticipation and gives you a list of warm people.
- Launch day: A main post (reel, carousel, video — whatever performs best for you) explaining what the course is, who it's for, and the launch price. Story with the link. Pin it. Email your list if you have one.
- Days 2–4: Share one useful tip from inside the course each day. Teaching a small piece of it is the best ad for the rest of it.
- Day 5–6: Share early reactions if you get them (with permission), and answer common questions in stories: "Do I need a fancy camera?" "How long do I have access?"
- Last day of launch pricing: A clear, honest reminder. "Launch price ends tonight." No fake countdown timers needed.
Then — and this is important — keep mentioning it after launch week. Most creators launch once, get a burst of sales, and then never talk about it again. Your audience is constantly growing and people miss posts. Mention the course in your content regularly, keep it near the top of your page, and it'll keep selling quietly in the background.
Step 8: Improve it with real feedback
Your first version won't be perfect. That's fine, that's normal, that's how every good course gets made.
After the first batch of students has gone through it:
- Ask them what was confusing. A quick email: "What was the one part you got stuck on?" Their answers tell you exactly which lesson to re-record or explain better.
- Watch where people stop. If lots of people stop after module 2, module 3 might be too long, or too hard a jump.
- Add what they ask for. Repeated questions become new lessons or new resources.
- Collect the wins. When a student sends you a "this worked!" message, ask if you can share it. Real results from real students are the best marketing you'll ever have.
Because the videos live on YouTube or Vimeo, updating a lesson is as simple as recording a better version and swapping the link. Existing students get the improvement automatically.
Common mistakes (so you can skip them)
Making it too long. Nobody has ever complained that a course got them to the result too fast.
Waiting until it's perfect. It won't be. Ship the useful version, then improve it.
Building before validating. Before you record 20 lessons, make sure people want it. A waitlist, a pre-sale, or even just a story poll helps. Some creators pre-sell at a discount before recording anything, then build the course with the first students' feedback.
Spending more on tools than you'll earn. It's very easy to spend $150 a month on a course platform, $50 on email software and $30 on a scheduling tool before you've sold a single copy. Start lean and only add tools when you have a real reason.
Hiding it. If your course is the fourth thing on your page under three random links, it won't sell. Put it where people can see it.
A note on fees
It's worth a quick look at what you'll actually pay per sale, because it adds up over time.
On Lynq, payments go directly to your Stripe account, and Stripe's normal processing fee applies (as it does on basically every platform). On top of that, Lynq takes a small platform fee on the Free plan and 0% on Pro. If you're selling regularly, Pro pays for itself quickly: from about $215 in sales a month (three course sales at $79), the fees you'd pay on Free cost more than Pro does.
The short version
If you've scrolled all the way down here looking for the summary, here it is:
- Find the topic people already ask you about.
- Narrow it to one person and one result.
- Outline 3–6 modules backwards from that result.
- Record short lessons with good audio and window light.
- Host the videos on YouTube (unlisted), Vimeo or Loom.
- Add notes and resources so it feels complete.
- Price it on the result, not the runtime. Pick the higher number.
- Put it on your link in bio and launch it for a week.
- Keep talking about it after launch.
- Improve it with real student feedback.
Most people who want to make a course never make one, and it's rarely because they don't know enough. It's because the whole thing feels bigger than it needs to be. It doesn't have to be. Pick the smallest useful version and get it out into the world.
Ready to build yours? Create a free Lynq page, add your first course, and sell it right from your link in bio. On Pro, you keep 100% of every sale (minus Stripe's processing fee). If you're not sure what to sell yet, start with our guide to selling digital products from your link in bio.